Unlike master database, restoring model and msdb is simple and follows the same procedure as restoring any other user database. However we have to be very cautious while restoring system databases as it will have sensitive data which is important for SQL Server to function without any issues.
Tuesday, September 10, 2013
Monday, December 5, 2011
Granting Read-Only and administrative access to Central Management Server (CMS)
In one of my previous post, I had discussed about the Central Management Server and how to Register it.
In this post, I will be telling how to give read-only access and a Administrative access to an existing CMS.
Grating the Read-Only and Administrative access to CMS is very simply and the activity includes adding the right database users to right groups in msdb database.
Granting Read-Only access:
In this post, I will be telling how to give read-only access and a Administrative access to an existing CMS.
Grating the Read-Only and Administrative access to CMS is very simply and the activity includes adding the right database users to right groups in msdb database.
Granting Read-Only access:
USE [msdb]
GO
CREATE USER [DBUserName] FOR LOGIN [LoginName]
GO
EXEC sp_addrolemember N'ServerGroupReaderRole', N'DBUserName'
GO
Granting Administrator access:
This access is usually give to the DBA's
USE [msdb]
GO
CREATE USER [DBAUserName] FOR LOGIN [DBALoginName]
GO
EXEC sp_addrolemember N'ServerGroupAdministratorRole', N'DBAUserName'
GO
Saturday, January 22, 2011
Send e-mail notification when a database is not online
Checking the databases availability is one of the major task of a DBA which has to be performed at regular intervals to make sure that the critical live databases are always online and fix them immediately if they are not online. This can be done in "n" number of ways and here is one such method.
The method that i am going to discuss below makes use of "Database Mail" option to send e-mails to the intended recipients when the process finds the status of the database which is not online.
If you have still not configured the "Database Mail" Option then Click Here to get the steps to configure "Database Mail" before you continue with this.
After the "Database Mail" Option is configured all you have to do is to create a job with the below code and schedule it to run every five minutes or every one minute depending on the criticality of the databases that you are going to monitor.
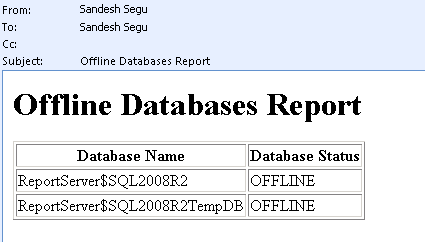
Use this Code if you wish to receive the e-mail in HTML format:
if(select count(*) from sys.databases where state_desc<>'Online')>0
Click Here to download this Code.
The method that i am going to discuss below makes use of "Database Mail" option to send e-mails to the intended recipients when the process finds the status of the database which is not online.
If you have still not configured the "Database Mail" Option then Click Here to get the steps to configure "Database Mail" before you continue with this.
After the "Database Mail" Option is configured all you have to do is to create a job with the below code and schedule it to run every five minutes or every one minute depending on the criticality of the databases that you are going to monitor.
Use this Code if you wish to receive the e-mail in HTML format:
if(select count(*) from sys.databases where state_desc<>'Online')>0
Begin
DECLARE @table NVARCHAR(MAX) ;
SET @table =
N'<H1>Offline Databases Report</H1>' +
N'<table border="1">' +
N'<tr><th>Database Name</th><th>Database Status</th></tr>' +
CAST ( ( Select td=name, '',td=state_desc from sys.databases where state_desc<>'Online'
FOR XML PATH('tr'), TYPE
) AS NVARCHAR(MAX) ) +
N'</table>' ;
EXEC msdb.dbo.sp_send_dbmail @profile_name='ProfileName', --Change to your Profile Name
@recipients='email@domain.com;email1@domain.com', --Put the email address of those who want to receive the e-mail
@subject = 'Offline Databases Report',
@body = @table,
@body_format = 'HTML' ;
END
Else Print 'All Databases are Online'
Click Here to download this Code.
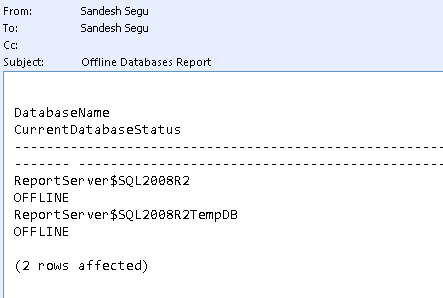
Use this Code if you wish to receive the e-mail in Plain Text format:
if(select count(*) from sys.databases where state_desc<>'Online')>0
Begin
EXEC msdb.dbo.sp_send_dbmail @profile_name='ProfileName', --Change to your Profile Name
@recipients='email@domain.com;email1@domain.com', --Put the email address of those who want to receive the e-mail
@subject = 'Offline Databases Report',
@Query='Select rtrim(ltrim(name)) as DatabaseName,rtrim(ltrim(state_desc)) as CurrentDatabaseStatus from sys.databases where state_desc<>''Online'''
END
Else Print 'All Databases are Online'
Click Here to download this Code.
Friday, January 21, 2011
Configuring Database Mail
Database Mail in SQL Server 2005 and up is the replacement of the SQL Mail that existed in SQL Server 2000. Database Mail is more enhanced than SQL mail and does not require a MAPI mail client like outlook or outlook express installed on the system for it to work.
Here is the procedure to setup or configure the Database mail.
Here is the procedure to setup or configure the Database mail.
- Enable Database Mail XPs
EXEC SP_CONFIGURE 'show advanced options',1GORECONFIGURE
EXEC SP_CONFIGURE 'Database Mail XPs',1GORECONFIGURE - Expand the "Management" Folder under your server. Right-Click on the "Database Mail" and Choose "Configure Database Mail"

- This will open up the Database Mail Configuration Wizard.
Now in the welcome page, click "Next" and in the "Select Configuration Task" Page choose the option "Setup Database Mail by performing the following tasks" and click "Next"

- Now in the next page "New Profile" the wizard gives you the option to create your mail profile and Add accounts to this profile. Fill in the Mail profile details and click on "Add" button to add the Mail accounts.

- In the "New Database Mail Account" page, fill in the Account Name, Description, Email Address, Display Name, Reply e-mail, Exchange Server Name and its Port Number. By default the port number will be 25. If it is different for your exchange server, then you have to mention that port number here.
Then Specify the SMTP Authentication and click "OK"

- Click "Next" in the resulting Page

- In the "Manage Profile Security" page, select the appropriate security for your profile.
Profiles are either Public or Private. A Private Profile is accessible only to specific Users or Roles. A Public Profile allows any Users or Roles with access to msdb database to send e-mail using that profile.


- In the next Screen, you can configure the System Properties.

- After configuring the System Parameters, click "Next". In the Summary Page, the wizard will display what actions will be performed. If you are satisfied then click "Finish" else Click "Back" button and do the changes as required.


- Now Send a Test E-mail. Right-Click on "Database Mail" and Choose "Send Test E-Mail..."
Now in the resulting Screen, select the "Mail Profile", enter the "To" E-Mail Address, Subject and Body and then Click on "Send Test E-Mail".


You can also send e-mail by using the SP sp_send_dbmail which will be present in the msdb database.
Exec msdb..sp_send_dbmail@profile_name='DBA',@recipients='segu.sandesh@gmail.com',@Subject='Test Email',@Body='Test Email from my Laptop'


This article is also available in pdf format for downloading.
Thursday, December 30, 2010
Moving model and msdb databases
Moving of model and msdb databases also follow the similar procedure as moving the tempdb database but with some additional steps.
Since these are also system databases, unfortunately we cannot move them just by detach and attach process, as we cannot attach or detach a system database.
Moving model database:
Moving msdb database:
Since these are also system databases, unfortunately we cannot move them just by detach and attach process, as we cannot attach or detach a system database.
Moving model database:
- First get the list of model database files by using this query
select name,physical_name from sys.master_files where DB_NAME(database_id)='model' - Then for each model database file that you need to move, execute statements like below
Alter Database model modify
file (NAME = 'modeldev' ,FILENAME = 'Drive:\Path\model.mdf') -- Mention the new location
Alter Database model modifyfile (NAME = 'modellog' ,FILENAME = 'Drive:\Path\modellog.ldf') -- Mention the new location
- Stop SQL Services
- Move the files manually to the new location
- Start SQL Services
- Verify the new Location
select name,physical_name from sys.master_files where DB_NAME(database_id)='model'
Moving msdb database:
- First get the list of msdb files by using this query
select name,physical_name from sys.master_files where DB_NAME(database_id)='msdb' - Then for each msdb database file that you need to move, execute statements like below
Alter Database msdb modify
file (NAME = 'MSDBData' ,FILENAME = 'Drive:\Path\MSDBData.mdf') -- Mention the new location
Alter Database msdb modifyfile (NAME = 'MSDBLog' ,FILENAME = 'Drive:\Path\MSDBLog.ldf') -- Mention the new location
- Stop SQL Services
- Move the files manually to the new location
- Start SQL Services
- Verify the new Location
select name,physical_name from sys.master_files where DB_NAME(database_id)='msdb'
Subscribe to:
Posts (Atom)