2010 | SansSQL

Thursday, December 30, 2010

Moving model and msdb databases

Moving of model and msdb databases also follow the similar procedure as moving the tempdb database but with some additional steps.
Since these are also system databases, unfortunately we cannot move them just by detach and attach process, as we cannot attach or detach a system database.

Moving model database:
  1. First get the list of model database files by using this query
    select name,physical_name from sys.master_files where DB_NAME(database_id)='model'  
  2. Then for each model database file that you need to move, execute statements like below
    Alter Database model modify
    file (NAME = 'modeldev' ,
    FILENAME = 'Drive:\Path\model.mdf') -- Mention the new location

    Alter Database model modify
    file (NAME = 'modellog' ,
    FILENAME = 'Drive:\Path\modellog.ldf') -- Mention the new location
  3. Stop SQL Services
  4. Move the files manually to the new location
  5. Start SQL Services
  6. Verify the new Location
    select name,physical_name from sys.master_files where DB_NAME(database_id)='model'

Moving msdb database
:
  1. First get the list of msdb files by using this query
    select name,physical_name from sys.master_files where DB_NAME(database_id)='msdb'  
  2. Then for each msdb database file that you need to move, execute statements like below
    Alter Database msdb modify
    file (NAME = 'MSDBData' ,
    FILENAME = 'Drive:\Path\MSDBData.mdf') -- Mention the new location

    Alter Database msdb modify
    file (NAME = 'MSDBLog' ,
    FILENAME = 'Drive:\Path\MSDBLog.ldf') -- Mention the new location
  3. Stop SQL Services
  4. Move the files manually to the new location
  5. Start SQL Services
  6. Verify the new Location
    select name,physical_name from sys.master_files where DB_NAME(database_id)='msdb'
If the SQL Server Instance is configured with Database Mail option, then after the msdb movement you will have to verify that the database mail is working fine by sending a test email.

Tuesday, December 28, 2010

Moving the tempdb database

There are cases when you might want to move tempdb database from an existing drive to a new drive.
  1. When the drive is full and you are in a situation where you cannot extend that drive.
  2. Move tempdb to a separate drive to increase its performance.
This is a simple process and cannot be done by detaching and attaching the database, as we cannot attach or detach a system database.
Also we need to restart the SQL services.

Here is the process how we can move the tempdb to a new location.
  1. First get the list of tempdb files by using this query
  2. select name,physical_name from sys.master_files where DB_NAME(database_id)='tempdb'
  3. Then for each tempdb file that you need to move, execute statements like below
  4. Alter Database tempdb modify file (NAME = 'tempdev' ,
    FILENAME = 'Drive:\Path\tempdb.mdf') -- Mention the new location
    Alter Database tempdb modify file (NAME = 'templog' , FILENAME = 'Drive:\Path\templog.ldf') -- Mention the new location
  5. Stop SQL Services
  6. Start SQL Services
  7. Verify the new Location
    select name,physical_name from sys.master_files where DB_NAME(database_id)='tempdb'

Friday, December 24, 2010

Start or Stop SQL Services using SQLCMD

In one of my previous post "SQLCMD Mode - Run your queries against several servers in a single query window.", i had explained on how to connect and execute queries in SQLCMD mode.
Hope that was useful.

In this post i will explaining on how to stop and start SQL Server services using SQLCMD mode.
First of all, Open a new query window and Change the query execution mode to SQLCMD.
Then type the below command in the new query window that is opened in the SQLCMD mode.
1. To start the services, use the below commands
/* Start Services */
!!NET START MSSQL$MSSQLSERVER

!!NET START SQLAGENT$MSSQLSERVER

2. To stop the services, use the below commands
/* Stop Services */
!!NET STOP SQLAGENT$MSSQLSERVER

!!NET STOP MSSQL$MSSQLSERVER

If you are trying to start or stop a default instance, then then will no changes to the above query.
If you are trying to start or stop a named instance, then Replace MSSQLSERVER with your instance name.
For example, if you are trying to start or stop the named instance "SQL2008", then the commands will look as below.

/* Stop Services */
!!NET STOP SQLAGENT$SQL2008

!!NET STOP MSSQL$SQL2008

/* Start Services */
!!NET START MSSQL$SQL2008

!!NET START SQLAGENT$SQL2008


Saturday, November 27, 2010

Quick flash back on MS SQL Server Code Names

Code Name         Final name                      
SQL95 SQL Server 6.0
Hydra SQL Server 6.5
Sphinx SQL Server 7.0
Shiloh SQL Server 2000 (32-bit)
Liberty SQL Server 2000 (64-bit)
Yukon SQL Server 2005
Katmai / Akadia SQL Server 2008
Kilimanjaro SQL Server 2008R2
Denali SQL Server 2012
Hekaton SQL Server 2014

Referencehttp://en.wikipedia.org/wiki/List_of_Microsoft_codenames#SQL_Server_family

Thursday, November 25, 2010

SQL Server 2008 : T-SQL Enhancement

As we all know, SQL Server 2008 came up with a huge number of changes which are helpful for both developers as well as DBA's. In this post I will be demonstrating about once such enhancement that is very helpful for data insertion.

The usual syntax for inserting data to a table is 

Insert into tbl_TSQLEnhancement values (1,'Usual','SansSQL')
Insert into tbl_TSQLEnhancement values (2,'Usual','Blog')
Insert into tbl_TSQLEnhancement values (3,'Usual','T-SQL')
Insert into tbl_TSQLEnhancement values (4,'Usual','SQL Server 2008')

If we are inserting multiple records at a time then we will have to write statements as shown above. But from SQL Server 2008 onwards, it is made easy by giving an option to insert more than one record in a single T-SQL statement as shown below.

Insert into tbl_TSQLEnhancement values
       (1,'New','SansSQL')
      ,(2,'New','Blog')
      ,(3,'New','T-SQL')
      ,(4,'New','SQL Server 2008')

Cool feature right?
So now it's time to try it out yourself.

/* Create Table */
Create Table tbl_TSQLEnhancement
(Id int not null,
Method nvarchar(10),
Name nvarchar(20))

/* Insert Data to table using Usual method */
Insert into tbl_TSQLEnhancement values (1,'Usual','SansSQL')
Insert into tbl_TSQLEnhancement values (2,'Usual','Blog')
Insert into tbl_TSQLEnhancement values (3,'Usual','T-SQL')
Insert into tbl_TSQLEnhancement values (4,'Usual','SQL Server 2008')

/* Insert Data to table using New method */
Insert into tbl_TSQLEnhancement values
       (1,'New','SansSQL')
      ,(2,'New','Blog')
      ,(3,'New','T-SQL')
      ,(4,'New','SQL Server 2008')

/* Retrive Data */
Select * from tbl_TSQLEnhancement

/* Cleanup Process */
Drop table tbl_TSQLEnhancement

Wednesday, November 17, 2010

Difference between Getdate() and GetUTCDate()


GETDATE()
GETDATE()
 function returns the current database system timestamp. This value is derived from the operating system of the computer on which the instance of SQL Server is running. 
If you are connected to the SQL server remotely then the timestamp displayed will be the timestamp of the SQL server machine and not your local machine.
UsageSELECT GETDATE() as [ServerTime]


GETUTCDATE(): 
GETUTCDATE() function returns the current UTC time. This value is derived from the operating system of the computer on which the instance of SQL Server is running. 
This can be used to store the timestamp that is independent of Time Zones.

Usage
SELECT GETUTCDATE() as [UTCTime]

Wednesday, November 10, 2010

MS SQL Server 2011 (Denali) Community Technology Preview 1 - Released

The Community Technology Preview (CTP) Version of MS SQL Server 2011 also know as 'Denali' is now available for download.
This is available in both 32 bit and 64 bit versions.
Click here to download CTP1 version of Denali.


To read about what's new in SQL Server 2011 code-named "Denali" - Community Technology Preview 1 (CTP1) click here.

Wednesday, October 27, 2010

Microsoft SQL Server 2008 Service Pack 2

Microsoft SQL Server 2008 Service Pack 2 (SP2) is now available for download. These packages may be used to upgrade any edition of SQL Server 2008. Service Pack 2 contains updates for SQL Server Utility, Data-Tier Application (DAC), as well as integration capability for Microsoft Reporting Services with the Microsoft SharePoint 2010 Technologies. 
Service Pack 2 introduces support for a maximum of 15,000 partitions in a database, and includes SQL Server 2008 SP1 Cumulative Update 1 to 8.  
To Continue reading and Download SQL Server 2008 Service Pack 2 Click Here.
To get the list of bugs that are fixed in SQL Server 2008 Service Pack 2 Click Here.

Tuesday, October 12, 2010

SQL Server System Views Map

The Microsoft SQL Server System Views Map shows the key system views included in SQL Server, and the relationships between them. 
This Map can be downloaded from the links below.


SQL Server 2008 System Views Map

Monday, October 4, 2010

Combining Profiler and Perfmon Data

For troubleshooting Performance issue on a SQL Server, profiler and perfmon plays a major role.
By combining both the data, the analysis will be very much easy as we can track the queries which are causing the issue at that part of time.

Here is how we can combine both the data.

To do this, we have to make sure that both the log files are time synched. This is Very Much Important for combining the 2 log files.

First create a perfmon log file by accessing the performance monitor.
     1.Click on “Run” and type “perfmon” and click “ok” to open the performance monitor.
     2.Create a data collector set with the required counters.
     3.Note down the data collector set name and close.

Now to make both the log files time synced, I have created 6 Jobs.
     1. “DBA - Start Perfmon” to start the perfmon from a SQL Job using operating system command.
     2. “DBA - Stop Perfmon” to stop the perfmon from a SQL Job using operating system command.
     3. “DBA - Start Tracing SQL Server” to start the SQL Profiler using the T-SQL Commands.
     4. “DBA - Stop Tracing SQL Server” to stop the SQL Profiler using the T-SQL Commands.
     5. “DBA - Start Perfmon and SQL Trace” to start both the perfmon and Profiler jobs.
     6. “DBA - Stop Perfmon and SQL Trace” to start both the perfmon and Profiler jobs.
The first 4 jobs are called by the 5th and 6th job to make sure that both the log files are in time synced.
You can download the scripts for these jobs from here.
Once you create the jobs, make sure to do the below changes.
     1. Change the Data Collector Set Name in “DBA - Start Perfmon” and “DBA - Stop Perfmon”


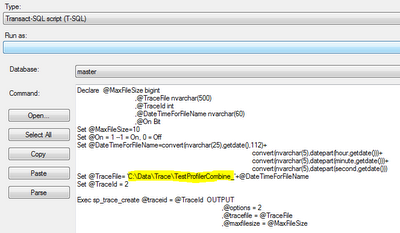
     2. Change the Trace file path in the job “DBA - Start Tracing SQL Server” 

 3. Add or remove any events as required in the job “DBA - Start Tracing SQL Server”


Once you have done all these changes, now start the job “DBA - Start Perfmon and SQL Trace” which in turn starts the jobs “DBA - Start Perfmon” and “DBA - Start Tracing SQL Server” and captures the data in the respective log files.


After an ample amount of time when you feel that the captured data is enough for your analysis then, start the job “DBA - Stop Perfmon and SQL Trace” which in turn starts the jobs “DBA - Stop Perfmon” and “DBA - Stop Tracing SQL Server” and stops capturing the data.


Once you get the log files,
1. Start SQL Profiler and open the SQL trace file (.trc file) in it.
2. Wait until the SQL Trace file is fully loaded.
3. Then go to File -> Import Performance Data.

4. Choose the Perfmon log file (.BLG, .CSV).


5. A dialog will open asking you to select the counters you would like to display. Select the required Counters and click OK.

6. Now you should get a screen looking similar to the below one.

This article is also available in pdf format for downloading.
Please Click here to get your copy.

Ads