January 2011 | SansSQL

Saturday, January 22, 2011

Send e-mail notification when a database is not online

Checking the databases availability is one of the major task of a DBA which has to be performed  at regular intervals to make sure that the critical live databases are always online and fix them immediately if they are not online. This can be done in "n" number of ways and here is one such method.
The method that i am going to discuss below makes use of "Database Mail" option to send e-mails to the intended recipients when the process finds the status of the database which is not online.
If you have still not configured the "Database Mail" Option then Click Here to get the steps to configure "Database Mail" before you continue with this.

After the "Database Mail" Option is configured all you have to do is to create a job with the below code and schedule it to run every five minutes or every one minute depending on the criticality of the databases that you are going to monitor.

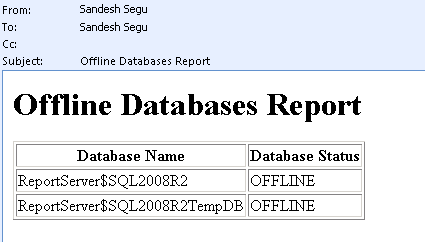
Use this Code if you wish to receive the e-mail in HTML format:
if(select count(*) from sys.databases where state_desc<>'Online')>0
Begin

DECLARE @table  NVARCHAR(MAX) ;

SET @table =
    N'<H1>Offline Databases Report</H1>' +
    N'<table border="1">' +
    N'<tr><th>Database Name</th><th>Database Status</th></tr>' +
    CAST ( ( Select td=name, '',td=state_desc from sys.databases where state_desc<>'Online'
              FOR XML PATH('tr'), TYPE
    ) AS NVARCHAR(MAX) )    +
    N'</table>' ;

EXEC msdb.dbo.sp_send_dbmail @profile_name='ProfileName', --Change to your Profile Name
      @recipients='email@domain.com;email1@domain.com', --Put the email address of those who want to receive the e-mail
    @subject = 'Offline Databases Report',
    @body = @table,
    @body_format = 'HTML' ;

END
Else Print 'All Databases are Online'

Click Here to download this Code.


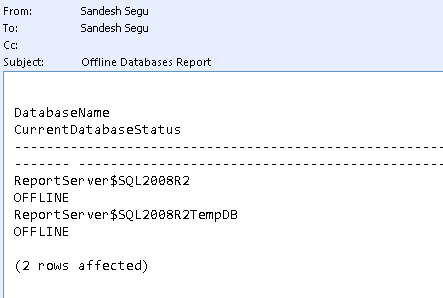
Use this Code if you wish to receive the e-mail in Plain Text format:
if(select count(*) from sys.databases where state_desc<>'Online')>0
Begin

EXEC msdb.dbo.sp_send_dbmail @profile_name='ProfileName', --Change to your Profile Name
      @recipients='email@domain.com;email1@domain.com', --Put the email address of those who want to receive the e-mail
    @subject = 'Offline Databases Report',
    @Query='Select rtrim(ltrim(name)) as DatabaseName,rtrim(ltrim(state_desc)) as CurrentDatabaseStatus from sys.databases where state_desc<>''Online'''
    
END
Else Print 'All Databases are Online'

Click Here to download this Code.

Friday, January 21, 2011

SSRS Error - An Unexpected Error occurred in Report Processing (rsInternalError)

I was working on a SQL Server Reporting Services (SSRS) Report just a few minutes back and i thought my deployment of the report went fine and i can now view my deployed reports on the Report Manager site.
Assuming that everything went fine, I opened the Report Manager and there was a surprise awaiting for me.
And the surprise was, the Report Manager which was working fine till yesterday is now giving an error.
The error is:
An Unexpected Error occurred in Report Processing (rsInternalError)
Could not find a part of the path 'C:\Documents and Settings\SANSLAPTOP\ASPNET.SANSLAPTOP.000\Local Settings\Temp\brhx7gi1.tmp


Fix that worked for me
:
I manually went into each folder structure that is displayed as part of the error message and found that in my case, the folder "Temp"  was missing in the file system.
I created this folder and went back to my report manager and refreshed the page and the report manager started to work as before.

Configuring Database Mail

Database Mail in SQL Server 2005 and up is the replacement of the SQL Mail that existed in SQL Server 2000. Database Mail is more enhanced than SQL mail and does not require a MAPI mail client like outlook or outlook express installed on the system for it to work.

Here is the procedure to setup or configure the Database mail.
  1. Enable Database Mail XPs
    EXEC SP_CONFIGURE 'show advanced options',1
    GO
    RECONFIGURE

    EXEC SP_CONFIGURE 'Database Mail XPs',1
    GO
    RECONFIGURE
  2. Expand the "Management" Folder under your server. Right-Click on the "Database Mail" and Choose "Configure Database Mail"
  3. This will open up the Database Mail Configuration Wizard.
    Now in the welcome page, click "Next" and in the "Select Configuration Task" Page choose the option "Setup Database Mail by performing the following tasks" and click "Next"
  4. Now in the next page "New Profile" the wizard gives you the option to create your mail profile and Add accounts to this profile. Fill in the Mail profile details and click on "Add" button to add the Mail accounts.
  5. In the "New Database Mail Account" page, fill in the Account Name, Description, Email Address, Display Name, Reply e-mail, Exchange Server Name and its Port Number. By default the port number will be 25. If it is different for your exchange server, then you have to mention that port number here.
    Then Specify the SMTP Authentication and click "OK"
  6. Click "Next" in the resulting Page
  7. In the "Manage Profile Security" page, select the appropriate security for your profile.
    Profiles are either Public or Private. A Private Profile is accessible only to specific Users or Roles. A Public Profile allows any Users or Roles with access to msdb database to send e-mail using that profile.


  8. In the next Screen, you can configure the System Properties.
  9. After configuring the System Parameters, click "Next". In the Summary Page, the wizard will display what actions will be performed. If you are satisfied then click "Finish" else Click "Back" button and do the changes as required.
     

  10. Now Send a Test E-mail. Right-Click on "Database Mail" and Choose "Send Test E-Mail..."
    Now in the resulting Screen, select the "Mail Profile", enter the "To" E-Mail Address, Subject and Body and then Click on "Send Test E-Mail".


    You can also send e-mail by using the SP sp_send_dbmail which will be present in the msdb database.
    Exec msdb..sp_send_dbmail
          @profile_name='DBA'
          ,@recipients='segu.sandesh@gmail.com'
          ,@Subject='Test Email'
          ,@Body='Test Email from my Laptop'
       

This article is also available in pdf format for downloading.
Please Click here to get your copy.

Friday, January 14, 2011

sp_refreshsubscriptions - An useful Transactional Replication Stored Procedure

Consider you are having a Transactional replication setup in a Live environment with a huge published database (For example, more than 50 GB publisher database size) , and you want to add an article to this existing publication without generating the snapshot for the all the articles. Also consider that the size of the new article that you are going to add is only 2 MB.:)
Now think, Do you really prefer to generate and apply the snapshot for the complete 50 GB database just for adding a 2 MB article?
I would really not prefer this as the environment is Live and its requires more time to complete the process of generating and applying snapshot. Then how will you achieve this?

You can do this by using the unpopular Transactional Replication Stored Procedure sp_refreshsubscriptions.
This stored proc expects a parameter "Publication Name" and has to be run on the publisher database.
When you run this on the publisher, it will mark only the newly added articles for generating snapshot.

Syntax:

exec sp_refreshsubscriptions 'PublicationName'
GO

Example:

-- Adding the transactional articles
use [AdventureWorks]
exec sp_addarticle @publication = N'TestAdv', @article = N'Contact', @source_owner = N'Person', @source_object = N'Contact', @type = N'logbased', @description = N'', @creation_script = N'', @pre_creation_cmd = N'drop', @schema_option = 0x000000000803509F, @identityrangemanagementoption = N'manual', @destination_table = N'Contact', @destination_owner = N'Person', @status = 24, @vertical_partition = N'false', @ins_cmd = N'CALL [dbo].[sp_MSins_PersonContact]', @del_cmd = N'CALL [dbo].[sp_MSdel_PersonContact]', @upd_cmd = N'SCALL [dbo].[sp_MSupd_PersonContact]'
GO

--Refresh Subscriptions
exec sp_refreshsubscriptions 'TestAdv'
GO

After running the above commands, run the snapshot agent.

Before running the sp_refreshsubscriptions SP, make sure that the publisher properties "allow_anonymous" and "immediate_sync" are set to "False", if these 2 options are set to "True" then this SP will mark all the articles for generating snapshot instead of marking only the newly added articles.

To Check the publication properties, use this query.

exec sp_helppublication 'PublicationName'
GO

If the values of the output columns "allow_anonymous" and "immediate_sync" are 0 then they are set to "False" if their values are 1 then they are set to "True"

To Change the publication properties for "allow_anonymous" and "immediate_sync", use this query

EXEC sp_changepublication
@publication = 'PublicationName',
@property = N'allow_anonymous',
@value = 'false'
GO
EXEC sp_changepublication
@publication = 'PublicationName',
@property = N'immediate_sync',
@value = 'false'
GO

Wednesday, January 12, 2011

Generate Database Script with its Objects

Generating the database script with its objects is one of the common tasks that a DBA would perform very frequently. This task may be carried out for various reasons like keeping the databases identical between environments and etc.

The process of scripting the database is simple and here is how to do this.
  1. Right-Click on the database which you choose to script out.
  2. Go to "Tasks" and choose "Generate Scripts"


  3. Now in the Script wizard, you will see the database that you want to script will be highlighted and there will be a check-box which "Script all objects in the selected database". If you select this check-box, then the wizard will script all the objects that are present in that particular database.
  4. After selecting the appropriate option click "Next" and now in the "Choose Script Options" page, select the option that you want to include in the script.
    From SQL Server 2008 onwards, you can choose to script the data also if needed. So to script the data, go to the "Table/View Options" in the "Choose Script Options" page and change the "Script Data" option to "True"


  5. If you have not choose the option to script all objects from step 3 then after clicking next, the wizard will ask you what type of objects it want to script. Select the object types and click "Next".
  6. Choose the objects that you want to script and click "Next".

  7. Now in the "Output Option" page, select how you want to store the output of this process and click "Next"
  8. Now the wizard will summarize on what actions it will perform. If you are satisfied with the action then click "Finish" else go back and change accordingly.


    This article is also available in pdf format for downloading.
    Please Click here to get your copy.

Saturday, January 8, 2011

How to clear most recently used (MRU) servers list

As the days move with your work on SQL Server management studio, it will accumulate the list of servers that you have been working on, starting from the point of installation of  SQL Server management studio.
This list is called as MRU servers list. Here MRU refers to Most Recently Used.
This makes your life easier by showing the most recently used servers by you and you can just select one from the list instead of remembering the server name and typing it manually.


As the list becomes big or the servers that you were using are no more used by you or for any other reasons you may want to clean up this list, Here is the process on how to clear the MRU servers list.

For SQL Server 2005
  1. Make sure that the "SQL Server management studio" is not opened
  2. Go to "Run"
  3. Type this command %APPDATA%\Microsoft\Microsoft SQL Server\90\Tools\Shell\ and click "ok". This will open up the folder where this list is stored
  4. Now search for the file "mru.dat" and rename this file.
  5. After renaming, launch the SQL Server management studio and you will not see any of the most recently used servers in the list.

For SQL Server 2008
  1. Make sure that the "SQL Server management studio" is not opened
  2. Go to "Run"
  3. Type this command %APPDATA%\Microsoft\Microsoft SQL Server\100\Tools\Shell\ and click "ok". This will open up the folder where this list is stored
  4. Now search for the file "SqlStudio.bin" and rename this file.
  5. After renaming, launch the SQL Server management studio and you will not see any of the most recently used servers in the list.

Friday, January 7, 2011

DTS packages in SQL Server 2005 and SQL Server 2008

As you all know that the DTS packages in SQL server 2000 is replaced by the giant called Integration Services which has more features than DTS, and DTS is no more supported in SQL Server 2005 and up.
To give a backward compatibility until the DTS packages are migrated(or converted by you) to SSIS packages, you can import the DTS packages into SQL Server 2005 and SQL Server 2008 and call them in the jobs to do their work.

These Imported packages will be present at the below location in SQL Server management Studio.
SQLServer>> Management>> Legacy>> Data Transformation Services.


The DTS packages under this path cannot be edited in SQL Server 2005 and SQL Server 2008.
For editing these packages, you need to install "DTS Designer Components"

If you want to edit DTS packages in SQL Server 2005 go here, download and install the component "SQLServer2005_DTS.msi"

If you want to edit DTS packages in SQL Server 2008 go here, download and install the component "SQLServer2005_BC.msi"

Once you install the DTS Designer Components, it will allow you to edit the DTS packages as you do in SQL Server 2000.
Just right-click on the package and choose the option "open" and this will open up the DTS designer for you.

I strongly recommend to convert the DTS packages to the SSIS packages as the support to DTS will be completed removed in future versions of SQL Server.

Saturday, January 1, 2011

Happy New Year 2011

Wishing you all a very happy and prosperous new year.


Moving master database


Moving master database is a bit different process than moving any other system database.This has to be carried out very carefully and here is the process on how to move the master database.
Before doing anything, make sure you are having proper backups.
  1. Stop the SQL Services.
  2. Go to the "SQL Server Configuration Manager".
    In SQL Server 2005, Click "Start" >> "All Programs" >> "Microsoft SQL Server 2005" >> "Configuration Tools" >> SQL Server Configuration Manager
    In SQL Server 2008, Click "Start" >> "All Programs" >> "Microsoft SQL Server 2008" >> "Configuration Tools" >> SQL Server Configuration Manager
  3. In the left pane, click on "SQL Server Services" 
  4. Now in the right pane, select the SQL Server Service component  (which looks like "SQL Server (InstanceName)" ) and go to its properties.
  5. In the "Properties" page, go to the "Advanced" tab
  6. In the "Startup Parameters", click on the drop list and modify the parameters -d and -l to the new location where you want the master data file (master.mdf) and log file (mastlog.ldf) to reside respectively.

    -d stands for the fully qualified data file path of master database.
    -l stands for the fully qualified log file path of master database.
    -e stands for the fully qualified path of the error log file.

  7. Now move the files manually to the new location.
  8. Start the SQL Services.

Ads