Use master
GO
Create proc sp_SpaceUsageReport (@Threshold int=80)
as
CREATE TABLE tempdb..SpaceUsage (
DatabaseName nvarchar(100)
,LogicalFileName nvarchar(500)
,FileType nvarchar(10)
,PhysicalFileLocation nvarchar(500)
,[FileSize (MB)] float
,[SpaceUsed (MB)] float
,[FreeSpace (MB)] float
,[% Used] AS 100-(([FileSize (MB)]-[SpaceUsed (MB)])/[FileSize (MB)])*(100)
,[% Free] AS (([FileSize (MB)]-[SpaceUsed (MB)])/[FileSize (MB)])*(100) )
If (SELECT Convert(varchar(1),(SERVERPROPERTY('ProductVersion')))) = 8
BEGIN
EXEC sp_MSforeachdb 'USE [?];
INSERT INTO tempdb..SpaceUsage(DatabaseName
,LogicalFileName
,FileType
,PhysicalFileLocation
,[FileSize (MB)]
,[SpaceUsed (MB)]
,[FreeSpace (MB)])
SELECT DB_NAME() AS DatabaseName
,name AS LogicalFileName
,FileType = CASE WHEN FILEPROPERTY(name,''IsLogFile'')=0 THEN ''Data File'' WHEN FILEPROPERTY(name,''IsLogFile'')=1 THEN ''Log File'' END
,filename AS PhysicalFileLocation
,CONVERT(float,ROUND(size/128.000,2)) AS [FileSize (MB)]
,CONVERT(float,ROUND(FILEPROPERTY(name,''SpaceUsed'')/128.000,2)) AS [SpaceUsed (MB)]
,CONVERT(float,ROUND((size-FILEPROPERTY(name,''SpaceUsed''))/128.000,2)) AS [FreeSpace (MB)]
FROM dbo.sysfiles
ORDER BY FileType '
END
If (SELECT Convert(varchar(1),(SERVERPROPERTY('ProductVersion'))))<> 8
BEGIN
EXEC sp_MSforeachdb 'USE [?];
INSERT INTO tempdb..SpaceUsage(DatabaseName
,LogicalFileName
,FileType
,PhysicalFileLocation
,[FileSize (MB)]
,[SpaceUsed (MB)]
,[FreeSpace (MB)])
SELECT DB_NAME() AS DatabaseName
,name AS LogicalFileName
,FileType = CASE WHEN type_desc =''Rows'' THEN ''Data File'' WHEN type_desc =''LOG'' THEN ''Log File'' END
,physical_name AS PhysicalFileLocation
,CONVERT(float,ROUND(size/128.000,2)) AS [FileSize (MB)]
,CONVERT(float,ROUND(FILEPROPERTY(name,''SpaceUsed'')/128.000,2)) AS [SpaceUsed (MB)]
,CONVERT(float,ROUND((size-FILEPROPERTY(name,''SpaceUsed''))/128.000,2)) AS [FreeSpace (MB)]
FROM sys.database_files
ORDER BY FileType'
END
if (Select COUNT(*) from tempdb..SpaceUsage where [% Used]>@Threshold)>0
Begin
/* -- Enable this Content if you want to send email.
DECLARE @table NVARCHAR(MAX),@Subject Nvarchar(500) ;
Set @Subject='[SQLAlert] Database Files Space Threshold exceeded Report from ' + CAST(@@SERVERNAME as nvarchar)
SET @table =
N'<H1>Threshold Value for this Report is '+CAST(@Threshold AS nvarchar)+' Percentage. </H1>' +
N'<table border="1">' +
N'<tr><th>DatabaseName</th><th>FileType</th><th>PhysicalFileLocation</th><th>FileSize (MB)</th><th>% Used</th></tr> ' +
CAST ( ( Select td=DatabaseName, '',td=FileType, '',td=PhysicalFileLocation,'',td=CAST([FileSize (MB)] as nvarchar),'',td=CAST([% Used] AS nvarchar) from tempdb..SpaceUsage where [% Used]>@Threshold
FOR XML PATH('tr'), TYPE
) AS NVARCHAR(MAX) ) +
N'</table>' ;
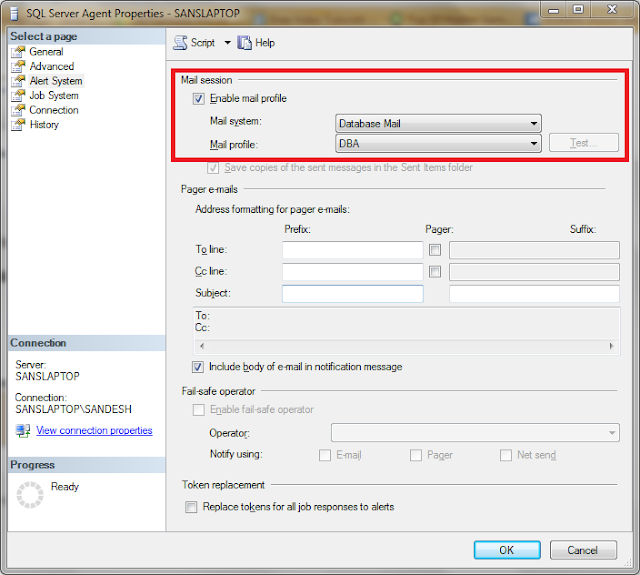
EXEC msdb.dbo.sp_send_dbmail @profile_name='DatabaseMail', --Change to your Profile Name
@recipients='sandeshsegu@SansSQL.com', --Put the email address of those who want to receive the e-mail
@subject = @Subject,
@body = @table,
@body_format = 'HTML' ;
*/
select * from tempdb..SpaceUsage where [% Used]>@Threshold
End
DROP TABLE tempdb..SpaceUsage
|